'The Death of Ivan Ilych' Leo Tolstoy, Fine Creative Media 2004
'Russian Houses' Elizabeth Gynor, Benedikt Taschen Verlag, 1994
'Interior Textiles: Fabrics, Applications, and Historic Styles' Karla J Neilson,John Wiley and Sons, 2007
'Scenic Design and Lighting Techniques: basic guide for Theatre' Chuck B Gloman, Focal Press 2007
'Tim Burton's Corpse Bride' Mark Sailsbury, Newmarket Press, 2005
Thursday, 26 May 2011
Wednesday, 25 May 2011
Final Photo shoot and filming
Today was the final day when all the necessary photographs were taken. Two members of the photography department came down to show us about appropriate lighting techniques for filming our sets. First thing in the morning we now had the rugs from Rhyan which were positioned in each room, then all the trinkets, books and nick knacks were assembled, some had to be borrowed from the other group just to fill out the gaps in cabinets. Fiona brought in a huge bunch of fake plants and flowers which we distributed about the room arranged in various vases, these added colour and life to the drawing room a definate contrast to the study filled with skulls, mould and darkness.
 Discussions took place and the group decided to take up the black fabric put over the windows to block out the light and workshop, we were to use the lines of the window with the softer lighting to illude to sunlight shining through. The drawing room had to be the warmer of the two rooms possibly eventually we used orange gels pegged to the two lights at the windows to achieve this. One smaller lipstick light was clamped to the beam on the ceiling with a sheet of fibreglass tissue / matting layered over to soften the intense light, it was held above the centre of the room to portray the light from an unseen chandelier. The effects of the lighting had to always be checked by how the frame looks through a camera (as it is different to the eye) adjusting the cameras iris settings. Other techniques we tried to stop the light being too direct was to bounce the light off a piece of white foam board, softening the light making it more natural.


 today but will hopefully upload copi
 es soon.


Tuesday, 24 May 2011
24th May finishing the room
On this last few days running upto the photoshoot and filming, we had limited but vital jobs left to do like laying the floor, patching up the paint work, painting the windows, hanging the drapes and applying pictures and other set dressing.The first job was to add more layers to the death corner. Using a technique shown to us by Henry Jones we used French/button polish and water which resulting in a minor reaction alluded to sticky wet surfaces with scatterings of mould and other corroding spores. By sponging on the polish in thick amounts sometimes encouraging drips but whilst still wet water was immediatly flicked or dripped onto the polish. This turns to foam and drys in a yellow stain but the more water applied, the whiter the stain. This same effect was blended aross the corner of the wall and the panelling as well as the floor behind the feet of the screen. The effect was also mimiced onto the fabric around the hole in the screen. The polish and paint did taint and stain the material but the water marks were not as clear, so using watered down white paint we created the similar drips and stains. The jersey velvet was very difficult to rip and tear convincingly. After much experiment we discovered the easiest ways to part the threads was to closely roughly cut frays with scissors and rip and pry them appart and rub them down with sand paper, below are some photos of our tests and final outcomes. 


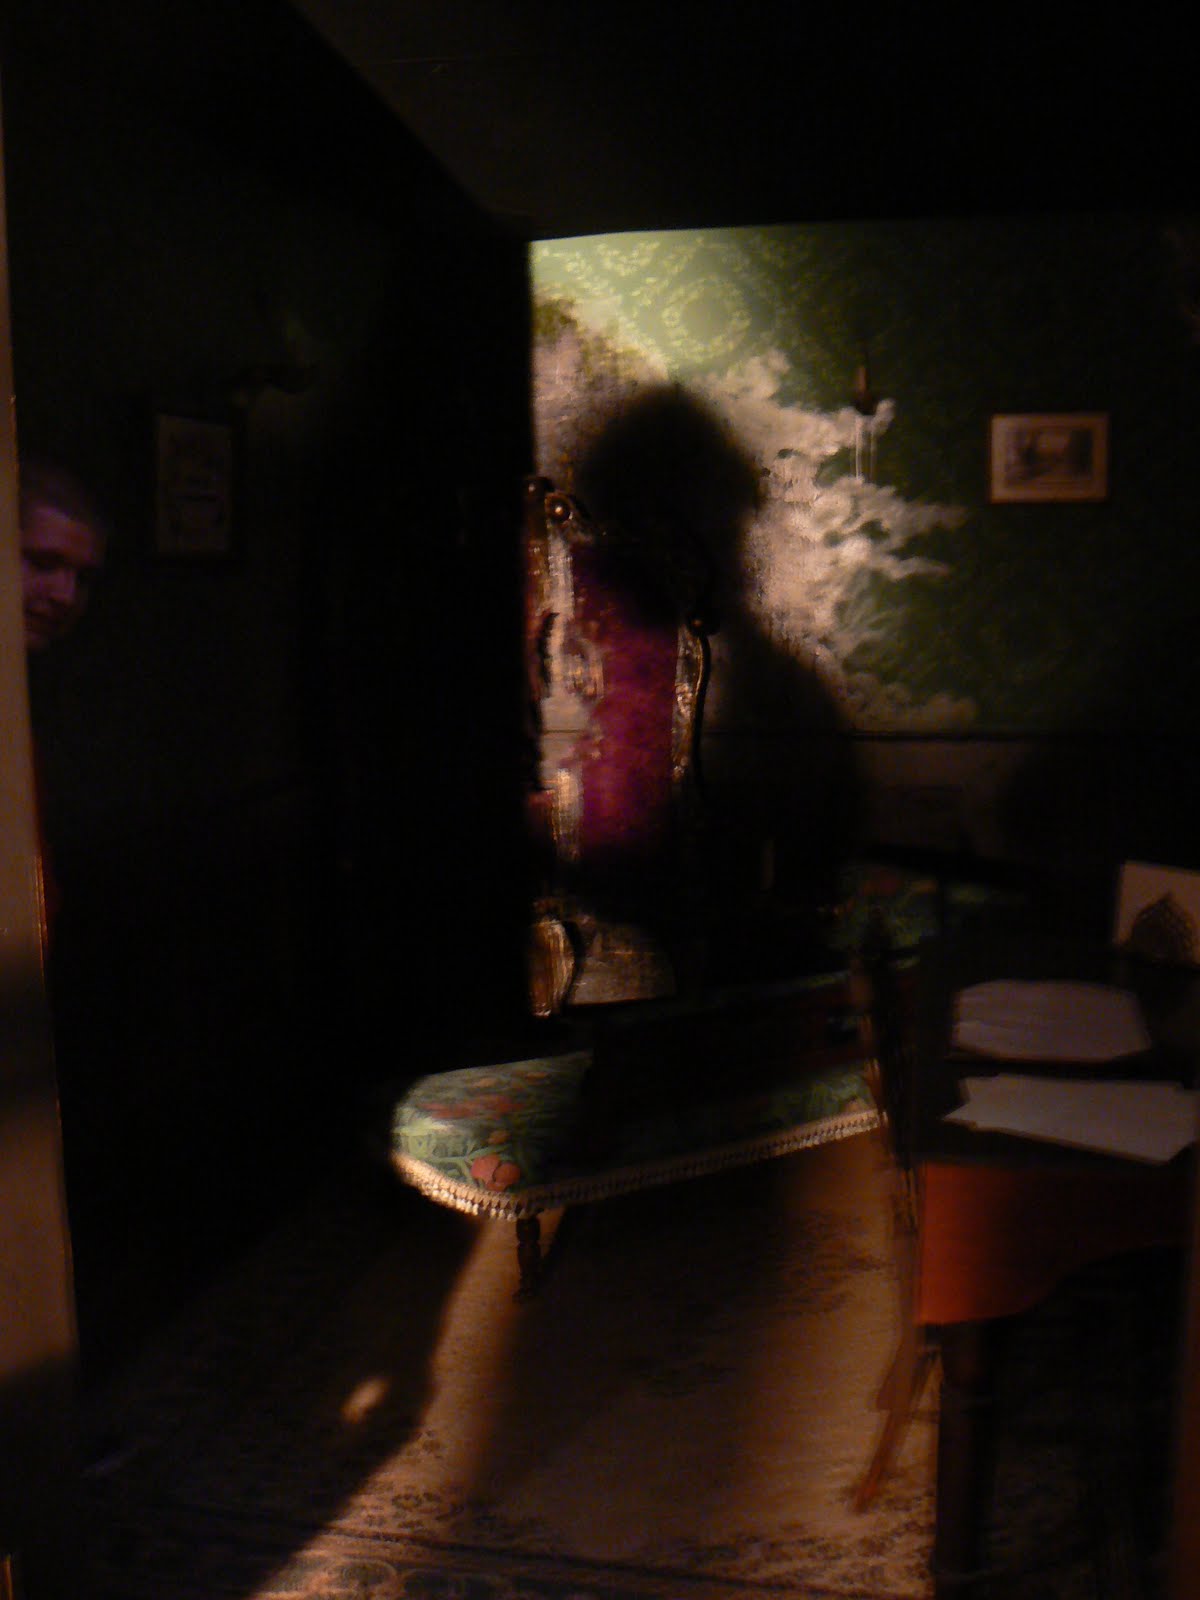
 other features of the day included painting the windows with dark oak varnish. Then once dry the curtains could be stapled to the top of the windows. One problem that occured was that the seperate swag in the study Lauren had beautifully made was unfortunatly the wrong way round for the way of the curtains, to over come this Iunpicked it and turned it round so the top was now the right side. Folding in the pleats and tacking them in place. Then tacking some of the green braid used on the chaise to the edges to add the the baroque style and detailing.
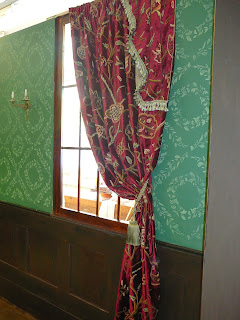
 Other features applied were the lights made by Kirby and Rob, also their deathly hand candles for the study both casts of kirby's hand and moulded in plaster painted gold and then layered with the wax drippings of the candles. Pictures were added to the restored frames including my embroidery made at Easter, old pictures of victorian towns from other peoples houses and printed baroque paintings. Old photographs included one of Tolstoy the author of the story and one of my great grandmother who played the part of the portrait of Mrs Illych, Ivans wife. The floors were layed down in the drawings room, some extra strips had to be cut to fill gaps or to make notches for uneven sections in the wall, this was done with the jigsaw. After the boards were laid then they were secured to the under floor and each other using duct tape.

Finally before we finished for the night everything was sprayed with fire retardent, a necessary requirement for any set or publicaly viewed theatrical or display piece.

Saturday, 21 May 2011
Psychological Film Review Essay
Psychological Horror in Film
 ng, sounds, actors and settings all contribute to the intense portrayals of dark narratives. Many films centre around one character, a protagonist and their families or people closest to them. The events of the film traditionally have a tragic and traumatic result for the protagonist and the audience are left to see the reactions of the friends. Using examples from Brad Anderson’s ‘The Machinist’ (2004), the protagonist Trevor Resnik's physical appearance is one of the first features depicted to the audience, and an element of why the audience becomes disturbed by his story. Actor Christian Bale lost 60 pounds for the role leaving his body practically skeletal. His physical appearance is tragic. Pale and malnourished as if the life is being sucked out of him. Along with the characters tiredness the hollows of his eye leave his face dark and lifeless. A key quote from the film repeated by two female characters close to him is "If you were any thinner you wouldn't exist." As an audience member it is assumed that secretly this is what Resnik wants, to slowly disappear from existence. His overall appearance does display him as a pitiful, tragic character, helping to gain some empathy towards this character which means that viewers become more engrossed in his suffering story. Though Resnik is an example of physical deterioration, he and other protagonists display mental deterioration.
 Haunting’ (Robert Wise 1963) characters who through actions of other characters or suspected paranormal activities become mentally manipulated and again the pattern follows that this leads to paranoia and then their eventual complete mental melt down. Jack Torrance on the other hand, played by Jack Nicholson is a perfect example of how the actors mannerisms, facial expression and gesture can enhance the visual intensity and tension of the character’s present state for an audience member. Nicholson takes this psychological thriller and pushes it over the genre boundary into horror. His character becomes frightening and unpredictable, violence is a catalyst for horror, as the tension builds the audience knows that a bloody end is near for someone. ‘The Shining’ is an incredibly intricate metaphor for the breakdown of the human mind. A Freudian Theory can be related to the three family members. Jack, the Father is a symbol of a ‘super ego’ the part of the mind that enforces rules and boundaries. His son Danny is the ‘id’ the untamed section of the mind which wants and desires with no knowledge of rules, and his mother, ‘the ego’ a compromiser between the two. As Jacks mind begins to corrupt the enforcement of the super ego increases threatening the other sections of the mind driving them away. The ego and the Id eventually flee the forceful hand of the enforcer, resulting in his demise. Author Gary Hoppenstand believes Jack Torrence to be “ A weakling who loves others only because he loves himself.” (Hoppenstand:1987:59) This most normal of emotions and metal states, pure selfishness is almost ike the foundations of Jack’s futures melt down, his mind was built on rotten foundations.
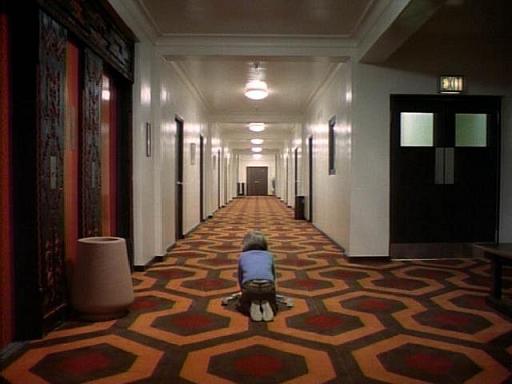 on of a specific moment. The photo to the right (from’ The Shining’) (http://www.chickinkiev.com/blog/index.php?paged=2 ) shows how a high angle elongated shot from behind the child takes the audience into a "god" view point becoming the second 'presence' in the room, an unseen presence. As the shot is from behind the child and the child is purposefully made to appear small in the shot his isolation is made even more enhanced. Our unseen presence also encourages the character to become paranoid, our view could also be through the eyes of another who is behind Danny, undetected and waiting to pounce on the unsuspecting character .
‘The Haunting’ by Robert Wise (1963) sees Dr John Markway gather three other people with prior paranormal experiences to investigate the haunting background of 'Hill House'. It is important to say at this point that no ghosts or apparitions are  seen in the film. The events are portrayed through strange use of lighting, diegetic sounds and uncontrollable movements of furniture. The architecture of the house is vitally important. Low angle camera shots enhance the house (picture above : http://s-tremain.blogspot.com/2010_11_01_archive.html) looming over the people destined to venture inside. with its, dark and gothic towers and large black windows it appears incredibly threatening. The protagonist Eleanor responds to this by saying that she thinks "It is staring at (me)".
 seen in the film. The events are portrayed through strange use of lighting, diegetic sounds and uncontrollable movements of furniture. The architecture of the house is vitally important. Low angle camera shots enhance the house (picture above : http://s-tremain.blogspot.com/2010_11_01_archive.html) looming over the people destined to venture inside. with its, dark and gothic towers and large black windows it appears incredibly threatening. The protagonist Eleanor responds to this by saying that she thinks "It is staring at (me)".
 s. There are other uses of camera shots to build the tension and terror. Very high angle shots are used to increase a sense of vertigo. The still to the left (http://www.horrortalk.com/reviews/412-the-haunting-1963.html) is a prime example of this. The scene contains a woman hanging herself at the top of the spiral stairs. The shot is well composed to allow only the bottom of the victim’s legs within the mise en scene and the sudden drop to the floor with nowhere to break the fall.
 ‘The Tenant’ (Roman Polanski 1976) Polanski uses a great deal of diegetic sound to enhance protagonist Trelkovsky's isolation and loneliness within this haunting apartment such as dripping taps, the moan of the water pipes and creaking floorboards. O
 ne Image that haunts both Trelkovsky and the audience is the image of previous tenant Simone's almost entirely bandaged face screaming in the hospital. An image se
In conclusion it takes many elements to build up an effective psychological thriller, the elements of action, light, sound and camera angle all build up the tension and layers of twisting plot that the audience have to take in and calculate in their mind. But in the end, as represented by these examples in this essay it is the old tricks of “there’s someone behind you” and “what will happen next”, or a frightening image that keep the focus and attention of the audience.
Bibliography
Horror Film Creating and Marketing Fear by Steffen Hantke 2004, University Press Mississippi, pg 123
The Gothic World of Stephen King: Landscape of Nightmares by Gary HoppenStand, 1987 Bowling Green State University Press pg 59
Death Corner
Rob and I late on Friday began working on the decay of the 'Death Corner'. Using the screen we were able to mark roughl y with a chalk how far we wanted the stain to come out on the wall not taking up too much of the brilliantly stenciled paper. Beginning with a layer of charcoal grey and burnt umber applied really thickly with a sponge to add texture saw dust and chippings were also added to create bulk and texture to mimic damp and mould. Some of the finer dust was lightly padded down to keep the colour alluding to mould spores. To blend out the sides a lot of water was randomy chucked at the wall using our hands and sponges to take away paint leaving lovely effects of negative drips and running water down the walls and the panelling. By vigorously rubbing the wall in places with a sponge I was able to take away some of the paint revealing the wall paper pattern beneath but some of the black paint had stuck to the paper leaving a blotchey mark that was very effective. Once the screen was in place the wall seemed more alive. Next week we will try adding some patches of french polish and water like we did on the actual screen.

 y with a chalk how far we wanted the stain to come out on the wall not taking up too much of the brilliantly stenciled paper. Beginning with a layer of charcoal grey and burnt umber applied really thickly with a sponge to add texture saw dust and chippings were also added to create bulk and texture to mimic damp and mould. Some of the finer dust was lightly padded down to keep the colour alluding to mould spores. To blend out the sides a lot of water was randomy chucked at the wall using our hands and sponges to take away paint leaving lovely effects of negative drips and running water down the walls and the panelling. By vigorously rubbing the wall in places with a sponge I was able to take away some of the paint revealing the wall paper pattern beneath but some of the black paint had stuck to the paper leaving a blotchey mark that was very effective. Once the screen was in place the wall seemed more alive. Next week we will try adding some patches of french polish and water like we did on the actual screen.

Panelling and Floor
The last features of the actual room to be completed was the panelling and the dado rail. The first part applied was the skirting boards 20cm wide 12mm thick MDF. with thin 6mm pieces to pad out the back. On these areas of padding that stand along the joins in the flats screws were drilled in. Above the skirting was the bottom of the panelling that was again a 12mm thick but 15cm wide length that was drilled straight onto the flat. Smaller lengths of this 15 cm MDF were cut at 14 cm long for the sides of the panels. A 40x40 square was used to mark out where these had to be drilled to the wall. First two notches had to be counter sunk on these pieces to ensure the screws would be hidden. Then another long length of 15cm was added to the top. on areas that need to be cut to measure, the wood was lined up and marked where it overlapped the already screwed piece. Using a square to draw the line and then a jigsaw to cut the piece to size. On the corners of the rooms if the 40x 40 didnt fit exactly then the piece of 40cm MDF was cut in half, one piece applied to each wall of the corner. Once all the panelling was applied Fiona and I went round with polyfiller to cover any gaps or obvious screws while Callum went round with a hand held router to route the inside sqaure of the panels and the line of the top where the dado would eventually sit. Rhyan and Nicky followed behind with a hoover to clean up the dust so they could be painted and glazed before the end of the week. The already routed dado lengths of pine were painted and glazed before being applied to the wall so not to mess up the wall paper. 


After I had helped apply the panelling and polyfiller the gaps, I went on to help Callum with the sheets of plywood that would be eventually the drawing room floor. We painted them with two thick layers of a dark oak varnish and once dry, using a length of the 15cm MDF Callum drew lines of the floorboards with a subtle black marker. Making these marks more realistic will be easier next week once the boards are on the ground in position.
End of the week (developments with room and furniture)
Whilst I was completing the screen many other pieces were also being completed. Fiona had finished glazing all the tiles so she and Nicky layed them all out on the floor to get the order of the designs correct, then using 'no more nails' Fiona applied each tile to the MDF heater that Callum had constructed. Kirby, Heather and Steph had stripped back the upholstery of the comfy chair then reupholstered it using some red and gold baroque fabric that Nicky supplied. Kirby then finished it off by picking out details on the dark wood with gold paint, just as Nicci had done with the table. 
 Fiona also was continuing with the decorating of the doors. Callum wood stained with a dark oak varnish the outer skin of the door. Fiona used small strips of routed wood painted gold and lengths of fabric from a table runner I bought. She stuck the fabric to the doors in panels using spray mount adhesive then using a hot glue gun stuck the gold wood to frame it off. Callum then fixed on the door handle and mounted the doors. The doors were too tight to close properly at the top so he sanded down the edges to make this an easier fit. Dan Chloe and Nuria have been undertaking the cabinet for the drawing room and the writing desk. The cabinet so far has been designed and made around recycling the curved wooden door from our Whatnot. The legs that they turned the other day have now been painted with the stain varnish.

 The Love seat for the drawing room has now been upholstered. Rhyan created the basic wooden frame at home using hardboard to bend round and form the curved shape of the seat. It has to be able to take the weight of two people. Using a staplegun and foam provided by Vicky. The foam was wrapped around the curve and then on the seat, an extra seat cusion was applied too, after the fabric was laid over. Gold braid was applied to finish off the edges.
Thursday, 19 May 2011
Finishing the Chaise and Screen
On the Tuesday and Wednesday of this week I managed to complete (with Nicky and Rob) my two allocated pieces of furniture. The chaise unlike most chaise lounge is not going to be pushed up against a wall, infact the back is facing the shot of the camera so areas of older wood had to be covered. To do this and not taint the wood underneath we cut a seperate piece of plywood in the curved shape of the leg side joined to the head rest. A template was made with paper and transferred onto the ply, once the ply was cut out on a bandsaw it was covered in doublesided tape and a strip of the William Morris fabric was stuck to the front, notches cut and then the fabric folded over and stuck to the back. Once this piece was covered we used hot glue to attach it to the chaise. Hot glue was a specific decision as it will be easier to remove without leaving marks or bits on the wood when it is eventually stripped off for return to Nicky's mum. After this was secured some areas on the wood had small patches of fabric stapled on but we completed it by hot gluing the last pieces of green and blue braid around this curved head rest detail. 

The screen was at the stage of painting after we had glued the seperate frames together with Evostick (contact adhesive) and clamped the pieces overnight to ensure a firm hold. Instead of creating woodgrain effect (we tried this but stopped because it did not work very well with all the lumps and details of the screen plus there was a lack of paint after other panels and furniture in the two groups rooms.) We wanted the screen to look burnt, dark and a dominant feature of the room. A piece that intimidates and looks engulfed by death and Ivan's fears and nightmares. The base coat was a dark brown (burnt umber). Then using a dry brush and some black paint I picked out areas of definition and shade blending and bleeding the black across, darkening the whole piece, resembling to me the roasted skin of a chestnut, a rich brown, blistered with black burns. Once these layers had dried I used a bronze acrylic applied with my finger to pick out the details and features. Later Rob and I completed the surface effect using French Polish, thickly applied and then Rob splashed droplets of water to the wet polish, this created a water mark with a slight white reaction that immediately aged the surface alluding to mould and stains.


The batwing detail was mounted in the top of the middle panel with araldite adhesive and two screws were then drilled into the back through to the two thicker sections of the hourglass. The next stage was to hinge the panels together. We screwed on the four brass hinges then stood up the screen to see if the weight distribution was equal. Unfortunately we came across many problems. One problem was that the two outer panels of the screen did not bend in enough inward to be able to stand, the wooden routed pieces at the bottom of the panels had to have the corners cut away to allow the screen to bend inward. Using a hack saw Rob took off these corners. Another issue was that the central panel was too top heavy and it leant backwards. We agreed we needed to make the screen rock forward to allow this weight to lean forward on the two outer feet. Using a jigsaw we cut slithers off these two outer feet. Wedges off the bottom now meant the screen could fall forward slightly and lean onto these two outer feet. Now the weight was evenly distributed because the central panel was not leaning backwards. The last thing was to touch up areas of paint that had not covered all the MDF or paper mache. We decided against adding the mirrors for many reasons. Though the mirrors would have been a great feature to the room and another distortion to focus on, real mirror would be very expensive to get cut to the sizes me needed (and breaking it would hae taken longer than we had to convinsingly reassemble) the fake plastic mirror surface that is sold in the store was more like a funhouse mirror it frosted and sratched very easily. Many people in the group said that the fun house effect woud have been good but in the back of my mind was alway the worry that it would just look fake. I figured we have done so well on it so far and I would hate to ruin it with over oing it with mirrors that never look convinsing. Plus the effects of the fabric were loved so much by the group we though it would be a shame to cover it with mirror.

Monday, 16 May 2011
16th May continuing the chaise
Today we continued with our seperately allocated items. The day was very productive with everyone focusing on their own work but helping out with others if they needed help. Nicky and I began to apply the braid onto the chaise. Out of the selection Nicky brought back with her we chose to use two different ones, a plain blue 3/4 inch braid for around the top half of the piece but also a green braid that had tassels this was a detail that suited framing the bottom of the chaise. Unfortunatly as these particular braids did not have the usual flap to hide the pins we had to attach this on with a hot glue gun instead of using upholstery pins. The pictures below show how the braid was attached after the trimming of the excess fabric, and its purpose in hiding the old wood and the staples. 

 Other activities that went on today included... Nicky and Callum fitting the second door onto its hinges, Fiona finished painting and glazing the tiles. Jenny and Rhyan completed the stenciling of the wallpaper, Steph and Kirby continued to plan how to baroque the comfy chair. Fiona brought in a vast selection of old picture frames and mirrors that already were of the baroque fashion but either needed repainting or fixing, Abby and Nicky proceeded to do this while Nicci used the gold paint to pick out delicate features of her table legs. Dan, Chloe and Nuria began work on the writing desk starting with the four legs, they skillfully carved the pine legs using a lathe. Lauren worked on painting her small table.


Subscribe to:
Posts (Atom)